Eliminate an unresponsive node
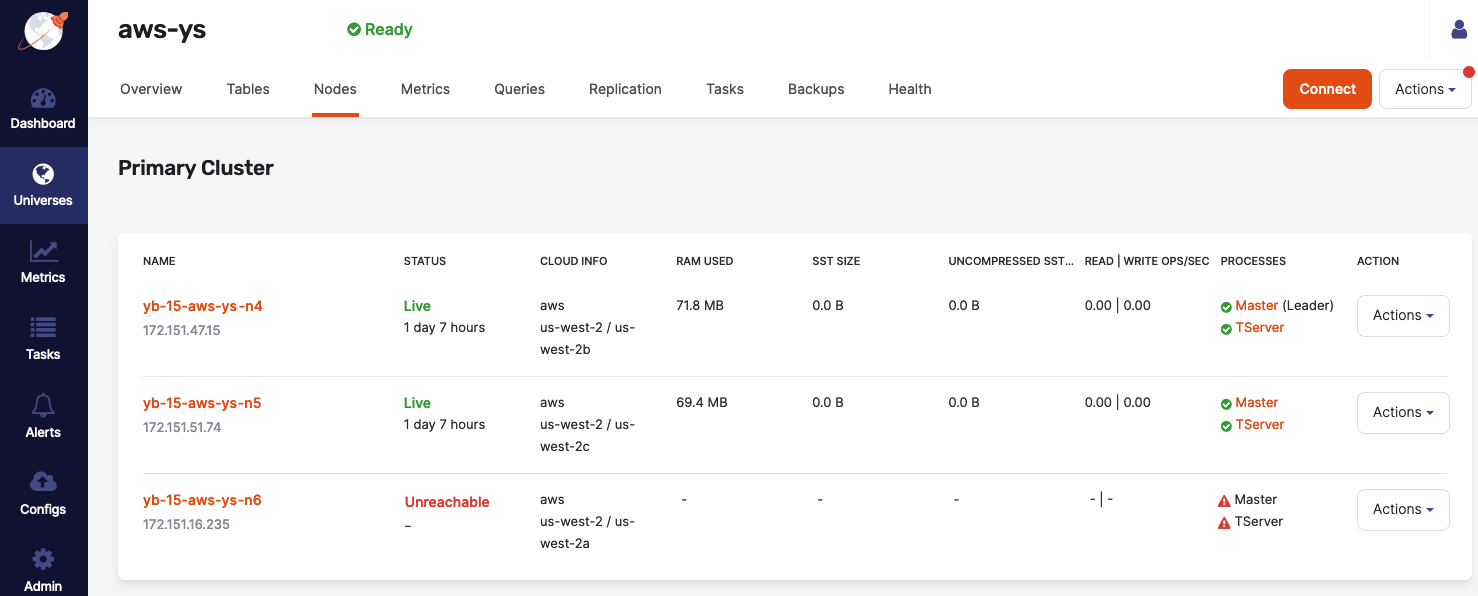
If a virtual machine or a physical server in a universe reaches its end of life and has unrecoverable hardware or other system issues, such as problems with its operating system, disk, and so on, it is detected and displayed in the Yugabyte Platform UI as an unreachable node, as per the following illustration:

When this happens, new Master leaders are elected for the underlying data shards, but since the universe enters a partially under-replicated state, it would not be able to tolerate additional failures. To remedy the situation, you can eliminate the unreachable node by taking actions in the following sequence:
- Step 1: Remove node
- Step 2: Release instance
- Step 3: Delete node
Note
A node status displayed in the UI is not always entirely indicative of the node's internal state. For example, a node whose status is shown as Unreachable can have various internal states, some of which are recoverable and others are not.Remove node
To perform the remove action on the yb-15-aws-ys-n6 node, click its corresponding Actions > Remove Node. This changes the value in the Status column from Unreachable to Removed and prevents access to data from this node.
There are no values in the Master and TServer columns for the yb-15-aws-ys-n6 node. Leader elections also occur for tablets for which this node was the leader tablet server.
The action to remove a node is available from the following internal states of the node:
-
ToJoinCluster
-
Live
-
Stopped
-
ToBeRemoved
Taking this action transfers the node to a Removing and then Removed internal state, as follows:
- If the node is a Master leader, it is removed (the Master process is stopped and there is a wait for the new Master leader).
- The TServer is marked as blacklisted on the Master leader.
- There is a wait for tablet quorums to remove the blacklisted TServer.
- Data migration is performed and the TServer process stops only if it is reachable.
- The node is marked as having neither Master nor TServer processes.
- DNS entries are updated.
The node removal action results in the instance still being allocated but not involved in any schemas.
Release node instance
To release the IP address associated with the yb-15-aws-ys-n6 node, click its corresponding Actions > Release Instance. This changes the value in the Status column from Removed to Decommissioned.
The Release Instance action releases the node instances in a cloud or frees up on-premise nodes.
The action to release a node instance is available from the Removed internal state of the node.
Taking this action transfers the node to a BeingDecommissioned and then Decommissioned internal state, as follows:
- There is a wait for Master leader.
- This server is removed from blacklist on Master leader (blacklisting is described in Remove node).
- The Master and TServer server tasks are stopped, if they have not been stopped already.
- The instance is destroyed.
- DNS entries are updated.
- Prometheus rules are updated and instructed to stop gathering metrics from this instance.
Delete node
You can perform the delete action via Actions corresponding to the node.
The action to delete a node is available from the following internal states of the node:
- ToBeAdded
- SoftwareInstalled
- Adding
- Decommissioned
Taking this action completely eliminates the node, as follows:
- Removes the node record from the universe metadata.
- Updates metadata in the database only.