Join us on YugabyteDB Community Slack
Star us on
Get Started
Slack
GitHub
Get Started
v2.13 (latest) v2.12 (stable) v2.8 (earlier version) v2.6 (earlier version) v2.4 (earlier version) v2.2 (earlier version) v2.1 (earlier version) v2.0 (earlier version) v1.3 (earlier version)
  • YUGABYTEDB CORE
    • Quick start
      • 1. Install YugabyteDB
      • 2. Create a local cluster
      • 3. Explore distributed SQL
      • 4. Build an application
        • Java
        • Node.js
        • Go
        • Python
        • Ruby
        • C#
        • PHP
        • C++
        • C
        • Scala
    • Explore
      • SQL features
        • Schemas and Tables
        • Data Types
        • Data Manipulation
        • Queries and Joins
        • Expressions and Operators
        • Stored Procedures
        • Triggers
        • Advanced features
          • Cursors
          • Table Partitioning
          • Views
          • Savepoints
          • Collations
          • Extensions
        • Going beyond SQL
          • Follower reads
          • Tablespaces
      • Fault tolerance
      • Horizontal scalability
        • Scaling Transactions
        • Sharding Data
      • Transactions
        • Distributed Transactions
        • Isolation Levels
        • Explicit Locking
      • Indexes and Constraints
        • Overview
        • Unique Indexes
        • Partial Indexes
        • Expression Indexes
        • Generalized Inverted Indexes
        • Primary Key
        • Foreign Key
        • Other Constraints
      • JSON support
      • Multi-region deployments
        • Sync replication (3+ regions)
        • Async Replication (2+ regions)
        • Row-Level Geo-Partitioning
        • Read replicas
      • Query tuning
        • Introduction
        • Get query statistics using pg_stat_statements
        • Viewing live queries with pg_stat_activity
        • Analyzing queries with EXPLAIN
        • Optimizing YSQL queries using pg_hint_plan
      • Cluster management
        • Point-in-time recovery
      • Security
      • Observability
        • Prometheus Integration
        • Grafana Dashboard
    • Develop
      • Learn app development
        • 1. SQL vs NoSQL
        • 2. Data modeling
        • 3. Data types
        • 4. ACID transactions
        • 5. Aggregations
        • 6. Batch operations
        • 7. Date and time
        • 8. Strings and text
        • 9. TTL for data expiration
      • Real-world examples
        • E-Commerce app
        • IoT fleet management
      • Explore sample apps
      • Best practices
      • Cloud-native development
        • Codespaces
        • Gitpod
    • Migrate
      • Migration process overview
      • Migrate from PostgreSQL
        • Convert a PostgreSQL schema
        • Migrate a PostgreSQL application
        • Export PostgreSQL data
        • Prepare a cluster
        • Import PostgreSQL data
        • Verify Migration
    • Deploy
      • Deployment checklist
      • Manual deployment
        • 1. System configuration
        • 2. Install software
        • 3. Start YB-Masters
        • 4. Start YB-TServers
        • 5. Verify deployment
      • Kubernetes
        • Single-zone
          • Open Source
          • Amazon EKS
          • Google Kubernetes Engine
          • Azure Kubernetes Service
        • Multi-zone
          • Amazon EKS
          • Google Kubernetes Engine
        • Multi-cluster
          • Google Kubernetes Engine
        • Best practices
        • Connect Clients
      • Docker
      • Public clouds
        • Amazon Web Services
        • Google Cloud Platform
        • Microsoft Azure
      • Multi-DC deployments
        • Three+ data center (3DC)
        • Asynchronous Replication
        • Read replica clusters
    • Benchmark
      • TPC-C
      • sysbench
      • YCSB
      • Key-value workload
      • Large datasets
      • Scalability
        • Scaling queries
      • Resilience
        • Jepsen testing
      • Performance Troubleshooting
    • Secure
      • Security checklist
      • Enable Authentication
        • Enable User Authentication
        • Configure ysql_hba_conf_csv
      • Authentication Methods
        • Password Authentication
        • LDAP Authentication
        • Host-Based Authentication
        • Trust Authentication
      • Role-Based Access Control
        • Overview
        • Manage Users and Roles
        • Grant Privileges
        • Row-Level Security (RLS)
        • Column-Level Security
      • Encryption in Transit
        • Create server certificates
        • Enable server-to-server encryption
        • Enable client-to-server encryption
        • Connect to Clusters
        • TLS and authentication
      • Encryption at rest
      • Column-level encryption
      • Audit Logging
        • Configure Audit Logging
        • Session-Level Audit Logging
        • Object-Level Audit Logging
      • Vulnerability disclosure policy
    • Manage
      • Back up and restore
        • Back up data
        • Restore data
        • Point-in-time recovery
        • Snapshot and restore data
      • Migrate data
        • Bulk import
        • Bulk export
      • Change cluster configuration
      • Diagnostics reporting
      • Upgrade a deployment
      • Grow cluster
    • Troubleshoot
      • Troubleshooting
      • Cluster level issues
        • YCQL connection issues
        • YEDIS connection Issues
        • Recover tserver/master
        • Replace a failed YB-TServer
        • Replace a failed YB-Master
        • Manual remote bootstrap when a majority of peers fail
      • Node level issues
        • Check servers
        • Inspect logs
        • System statistics
        • Disk failure
        • Common error messages
    • Contribute
      • Core database
        • Contribution checklist
        • Build the source
        • Configure a CLion project
        • Run the tests
        • Coding style
  • YUGABYTE PLATFORM
    • Overview
      • Install
      • Configure
    • Install Yugabyte Platform
      • Prerequisites
      • Prepare the environment
      • Install software
      • Prepare nodes (on-prem)
      • Uninstall software
    • Configure Yugabyte Platform
      • Create admin user
      • Configure the cloud provider
      • Configure the backup target
      • Configure alerts
    • Create deployments
      • Multi-zone universe
      • Multi-region universe
      • Multi-cloud universe
      • Read replica cluster
      • Asynchronous replication
    • Manage deployments
      • Start and stop processes
      • Add a node
      • Eliminate an unresponsive node
      • Enable high availability
      • Edit configuration flags
      • Edit a universe
      • Delete a universe
      • Configure instance tags
      • Upgrade YugabyteDB software
      • Migrate to Helm 3
    • Back up universes
      • Configure backup storage
      • Back up universe data
      • Restore universe data
      • Schedule data backups
    • Security
      • Security checklist
      • Customize ports
      • LDAP authentication
      • Authorization platform
      • Create a KMS configuration
      • Enable encryption at rest
      • Enable encryption in transit (TLS)
      • Network security
    • Alerts and monitoring
      • Alerts
      • Live Queries dashboard
      • Slow Queries dashboard
    • Troubleshoot
      • Install and upgrade issues
      • Universe issues
    • Administer Yugabyte Platform
      • Back Up Yugabyte Platform
      • Authenticate with LDAP
    • Upgrade Yugabyte Platform
      • Upgrade using Replicated
  • YUGABYTE CLOUD
    • Overview
    • Quick start
      • Create a free cluster
      • Connect to the cluster
      • Create a database
      • Explore distributed SQL
      • Build an application
        • Before you begin
        • Java
        • Go
        • Python
        • Node.js
        • C
        • C++
        • C#
        • Ruby
        • Rust
        • PHP
    • Deploy clusters
      • Planning a cluster
      • Create a free cluster
      • Create a standard cluster
      • VPC network
        • Overview
        • Set up a VPC network
        • VPCs
        • Peering Connections
    • Secure clusters
      • IP allow lists
      • Database authorization
      • Add database users
      • Encryption in transit
      • Audit cloud activity
    • Connect to clusters
      • Cloud Shell
      • Client shell
      • Connect applications
    • Alerts and monitoring
      • Alerts
      • Performance metrics
      • Live queries
      • Slow YSQL queries
      • Cluster activity
    • Manage clusters
      • Backup and restore
      • Scale and configure clusters
      • Create extensions
    • Administer Yugabyte Cloud
      • Manage cloud users
      • Manage billing
      • Cluster costs
    • Example applications
      • Connect a Spring application
      • Connect a YCQL Java application
      • Hasura Cloud
      • Deploy a GraphQL application
    • Security architecture
      • Security architecture
      • Shared responsibility model
    • Troubleshoot
    • Yugabyte Cloud FAQ
    • What's new
  • INTEGRATIONS
    • Apache Kafka
    • Apache Spark
    • JanusGraph
    • KairosDB
    • Presto
    • Metabase
    • WSO2 Identity Server
    • YSQL Loader
    • Yugabyte JDBC Driver
    • Prisma
    • Hasura
      • Application Development
      • Benchmarking
    • Spring Framework
      • Spring Data YugabyteDB
      • Spring Data Cassandra
    • Flyway
    • GORM
    • Liquibase
    • Sequelize
    • SQLAlchemy
    • Entity Framework
    • Django REST framework
  • REFERENCE
    • Architecture
      • Design goals
      • Key concepts
        • Universe
        • YB-TServer Service
        • YB-Master Service
      • Core functions
        • Universe creation
        • Table creation
        • Write IO path
        • Read IO path
        • High availability
      • Layered architecture
      • Query layer
        • Overview
      • DocDB transactions layer
        • Transactions overview
        • Transaction isolation levels
        • Explicit locking
        • Read Committed
        • Single-row transactions
        • Distributed transactions
        • Transactional IO path
      • DocDB sharding layer
        • Hash & range sharding
        • Tablet splitting
        • Colocated tables
      • DocDB replication layer
        • Replication
        • xCluster replication
        • Read replicas
        • Change data capture (CDC)
      • DocDB storage layer
        • Persistence
        • Performance
    • APIs
      • YSQL
        • The SQL language
          • SQL statements
            • ABORT
            • ALTER DATABASE
            • ALTER DEFAULT PRIVILEGES
            • ALTER DOMAIN
            • ALTER GROUP
            • ALTER POLICY
            • ALTER ROLE
            • ALTER SEQUENCE
            • ALTER TABLE
            • ALTER USER
            • ANALYZE
            • BEGIN
            • CALL
            • COMMENT
            • COMMIT
            • COPY
            • CREATE AGGREGATE
            • CREATE CAST
            • CREATE DATABASE
            • CREATE DOMAIN
            • CREATE EXTENSION
            • CREATE FUNCTION
            • CREATE GROUP
            • CREATE INDEX
            • CREATE MATERIALIZED VIEW
            • CREATE OPERATOR
            • CREATE OPERATOR CLASS
            • CREATE POLICY
            • CREATE PROCEDURE
            • CREATE ROLE
            • CREATE RULE
            • CREATE SCHEMA
            • CREATE SEQUENCE
            • CREATE TABLE
            • CREATE TABLE AS
            • CREATE TRIGGER
            • CREATE TYPE
            • CREATE USER
            • CREATE VIEW
            • DEALLOCATE
            • DELETE
            • DO
            • DROP AGGREGATE
            • DROP CAST
            • DROP DATABASE
            • DROP DOMAIN
            • DROP EXTENSION
            • DROP FUNCTION
            • DROP GROUP
            • DROP MATERIALIZED VIEW
            • DROP OPERATOR
            • DROP OPERATOR CLASS
            • DROP OWNED
            • DROP POLICY
            • DROP PROCEDURE
            • DROP ROLE
            • DROP RULE
            • DROP SEQUENCE
            • DROP TABLE
            • DROP TRIGGER
            • DROP TYPE
            • DROP USER
            • END
            • EXECUTE
            • EXPLAIN
            • GRANT
            • INSERT
            • LOCK
            • PREPARE
            • REASSIGN OWNED
            • REFRESH MATERIALIZED VIEW
            • RELEASE SAVEPOINT
            • RESET
            • REVOKE
            • ROLLBACK
            • ROLLBACK TO SAVEPOINT
            • SAVEPOINT
            • SELECT
            • SET
            • SET CONSTRAINTS
            • SET ROLE
            • SET SESSION AUTHORIZATION
            • SET TRANSACTION
            • SHOW
            • SHOW TRANSACTION
            • TRUNCATE
            • UPDATE
            • VALUES
          • WITH clause
            • WITH clause—SQL syntax and semantics
            • recursive CTE
            • case study—traversing an employee hierarchy
            • traversing general graphs
              • graph representation
              • common code
              • undirected cyclic graph
              • directed cyclic graph
              • directed acyclic graph
              • rooted tree
              • Unique containing paths
              • Stress testing find_paths()
            • case study—Bacon Numbers from IMDb
              • Bacon numbers for synthetic data
              • Bacon numbers for IMDb data
        • Data types
          • Array
            • array[] constructor
            • Literals
              • Text typecasting and literals
              • Array of primitive values
              • Row
              • Array of rows
            • FOREACH loop (PL/pgSQL)
            • array of DOMAINs
            • Functions and operators
              • ANY and ALL
              • Array comparison
              • Array slice operator
              • Array concatenation
              • Array properties
              • array_agg(), unnest(), generate_subscripts()
              • array_fill()
              • array_position(), array_positions()
              • array_remove()
              • array_replace() / set value
              • array_to_string()
              • string_to_array()
          • Binary
          • Boolean
          • Character
          • Date and time
            • Conceptual background
            • Timezones and UTC offsets
              • Catalog views
              • Extended_timezone_names
                • Unrestricted full projection
                • Real timezones with DST
                • Real timezones no DST
                • Synthetic timezones no DST
              • Offset/timezone-sensitive operations
                • Timestamptz to/from timestamp conversion
                • Pure 'day' interval arithmetic
              • Four ways to specify offset
                • Name-resolution rules
                  • 1 case-insensitive resolution
                  • 2 ~names.abbrev never searched
                  • 3 'set timezone' string not resolved in ~abbrevs.abbrev
                  • 4 ~abbrevs.abbrev before ~names.name
                  • Helper functions
              • Syntax contexts for offset
              • Recommended practice
            • Typecasting between date-time and text-values
            • Semantics of the date-time data types
              • Date data type
              • Time data type
              • Plain timestamp and timestamptz
              • Interval data type
                • Interval representation
                  • Ad hoc examples
                  • Representation model
                • Interval value limits
                • Declaring intervals
                • Justify() and extract(epoch...)
                • Interval arithmetic
                  • Interval-interval comparison
                  • Interval-interval addition and subtraction
                  • Interval-number multiplication
                  • Moment-moment overloads of "-"
                  • Moment-interval overloads of "+" and "-"
                • Custom interval domains
                • Interval utility functions
            • Typecasting between date-time datatypes
            • Operators
              • Test comparison overloads
              • Test addition overloads
              • Test subtraction overloads
              • Test multiplication overloads
              • Test division overloads
            • General-purpose functions
              • Creating date-time values
              • Manipulating date-time values
              • Current date-time moment
              • Delaying execution
              • Miscellaneous
                • Function age()
                • Function extract() | date_part()
                • Implementations that model the overlaps operator
            • Formatting functions
            • Case study—SQL stopwatch
            • Download & install the date-time utilities
            • ToC
          • JSON
            • JSON literals
            • Primitive and compound data types
            • Code example conventions
            • Indexes and check constraints
            • Functions & operators
              • ::jsonb, ::json, ::text (typecast)
              • ->, ->>, #>, #>> (JSON subvalues)
              • - and #- (remove)
              • || (concatenation)
              • = (equality)
              • @> and <@ (containment)
              • ? and ?| and ?& (key or value existence)
              • array_to_json()
              • jsonb_agg()
              • jsonb_array_elements()
              • jsonb_array_elements_text()
              • jsonb_array_length()
              • jsonb_build_object()
              • jsonb_build_array()
              • jsonb_each()
              • jsonb_each_text()
              • jsonb_extract_path()
              • jsonb_extract_path_text() and json_extract_path_text()
              • jsonb_object()
              • jsonb_object_agg()
              • jsonb_object_keys()
              • jsonb_populate_record()
              • jsonb_populate_recordset()
              • jsonb_pretty()
              • jsonb_set() and jsonb_insert()
              • jsonb_strip_nulls()
              • jsonb_to_record()
              • jsonb_to_recordset()
              • jsonb_typeof()
              • row_to_json()
              • to_jsonb()
          • Money
          • Numeric
          • Range
          • Serial
          • UUID
        • Functions and operators
          • Aggregate functions
            • Informal functionality overview
            • Invocation syntax and semantics
            • grouping sets, rollup, cube
            • Per function signature and purpose
              • avg(), count(), max(), min(), sum()
              • array_agg(), string_agg(), jsonb_agg(), jsonb_object_agg()
              • bit_and(), bit_or(), bool_and(), bool_or()
              • variance(), var_pop(), var_samp(), stddev(), stddev_pop(), stddev_samp()
              • linear regression
                • covar_pop(), covar_samp(), corr()
                • regr_%()
              • mode(), percentile_disc(), percentile_cont()
              • rank(), dense_rank(), percent_rank(), cume_dist()
            • case study—percentile_cont() and the "68–95–99.7" rule
            • case study—linear regression on COVID data
              • Download the COVIDcast data
              • Ingest the COVIDcast data
                • Inspect the COVIDcast data
                • Copy the .csv files to staging tables
                • Check staged data conforms to the rules
                • Join the staged data into a single table
                • SQL scripts
                  • Create cr_staging_tables()
                  • Create cr_copy_from_scripts()
                  • Create assert_assumptions_ok()
                  • Create xform_to_covidcast_fb_survey_results()
                  • ingest-the-data.sql
              • Analyze the COVIDcast data
                • symptoms vs mask-wearing by day
                • Data for scatter-plot for 21-Oct-2020
                • Scatter-plot for 21-Oct-2020
                • SQL scripts
                  • analysis-queries.sql
                  • synthetic-data.sql
          • currval()
          • lastval()
          • nextval()
          • Window functions
            • Informal functionality overview
            • Invocation syntax and semantics
            • Per function signature and purpose
              • row_number(), rank() and dense_rank()
              • percent_rank(), cume_dist() and ntile()
              • first_value(), nth_value(), last_value()
              • lag(), lead()
              • Tables for the code examples
                • table t1
                • table t2
                • table t3
                • table t4
            • case study—analyzing a normal distribution
              • Bucket allocation scheme
              • do_clean_start.sql
              • cr_show_t4.sql
              • cr_dp_views.sql
              • cr_int_views.sql
              • cr_pr_cd_equality_report.sql
              • cr_bucket_using_width_bucket.sql
              • cr_bucket_dedicated_code.sql
              • do_assert_bucket_ok
              • cr_histogram.sql
              • cr_do_ntile.sql
              • cr_do_percent_rank.sql
              • cr_do_cume_dist.sql
              • do_populate_results.sql
              • do_report_results.sql
              • do_compare_dp_results.sql
              • do_demo.sql
              • Reports
                • Histogram report
                • dp-results
                • compare-dp-results
                • int-results
          • yb_hash_code()
        • Extensions
        • Keywords
        • Reserved names
      • YCQL
        • ALTER KEYSPACE
        • ALTER ROLE
        • ALTER TABLE
        • CREATE INDEX
        • CREATE KEYSPACE
        • CREATE ROLE
        • CREATE TABLE
        • CREATE TYPE
        • DROP INDEX
        • DROP KEYSPACE
        • DROP ROLE
        • DROP TABLE
        • DROP TYPE
        • GRANT PERMISSION
        • GRANT ROLE
        • REVOKE PERMISSION
        • REVOKE ROLE
        • USE
        • INSERT
        • SELECT
        • EXPLAIN
        • UPDATE
        • DELETE
        • TRANSACTION
        • TRUNCATE
        • Simple expressions
        • Subscripted expressions
        • Function call
        • Operators
        • BLOB
        • BOOLEAN
        • Collection
        • FROZEN
        • INET
        • Integer and counter
        • Non-integer
        • TEXT
        • DATE, TIME, and TIMESTAMP
        • UUID and TIMEUUID
        • JSONB
        • Date and time
        • BATCH
    • CLIs
      • yb-ctl
      • yb-docker-ctl
      • ysqlsh
      • ycqlsh
      • yb-admin
      • yb-ts-cli
      • ysql_dump
      • ysql_dumpall
    • Configuration
      • yb-tserver
      • yb-master
      • yugabyted
      • Default ports
    • Drivers
      • Client drivers for YSQL
      • Client drivers for YCQL
    • Connectors
      • Kafka Connect YugabyteDB
    • Third party tools
      • Arctype
      • DBeaver
      • DbSchema
      • pgAdmin
      • SQL Workbench/J
      • TablePlus
      • Visual Studio Code
    • Sample datasets
      • Chinook
      • Northwind
      • PgExercises
      • SportsDB
      • Retail Analytics
  • RELEASES
    • Releases overview
      • v2.13 series (latest)
      • v2.12 series (stable)
      • v2.11 series
      • v2.9 series
      • v2.8 series
      • v2.7 series
      • v2.6 series
      • v2.5 series
      • v2.4 series
      • v2.3 series
      • v2.2 series
      • v2.1 series
      • v2.0 series
      • v1.3 series
      • v1.2 series
    • Release versioning
  • FAQ
    • Comparisons
      • Amazon Aurora
      • Google Cloud Spanner
      • CockroachDB
      • TiDB
      • Vitess
      • MongoDB
      • FoundationDB
      • Amazon DynamoDB
      • Azure Cosmos DB
      • Apache Cassandra
      • PostgreSQL
      • Redis in-memory store
      • Apache HBase
    • General FAQ
    • Operations FAQ
    • API compatibility FAQ
    • Yugabyte Platform FAQ
  • MISC
    • YEDIS
      • Quick start
      • Develop
        • Build an application
        • C#
        • C++
        • Go
        • Java
        • NodeJS
        • Python
      • API reference
        • APPEND
        • AUTH
        • CONFIG
        • CREATEDB
        • DELETEDB
        • LISTDB
        • SELECT
        • DEL
        • ECHO
        • EXISTS
        • EXPIRE
        • EXPIREAT
        • FLUSHALL
        • FLUSHDB
        • GET
        • GETRANGE
        • GETSET
        • HDEL
        • HEXISTS
        • HGET
        • HGETALL
        • HINCRBY
        • HKEYS
        • HLEN
        • HMGET
        • HMSET
        • HSET
        • HSTRLEN
        • HVALS
        • INCR
        • INCRBY
        • KEYS
        • MONITOR
        • PEXPIRE
        • PEXPIREAT
        • PTTL
        • ROLE
        • SADD
        • SCARD
        • RENAME
        • SET
        • SETEX
        • PSETEX
        • SETRANGE
        • SISMEMBER
        • SMEMBERS
        • SREM
        • STRLEN
        • ZRANGE
        • TSADD
        • TSCARD
        • TSGET
        • TSLASTN
        • TSRANGEBYTIME
        • TSREM
        • TSREVRANGEBYTIME
        • TTL
        • ZADD
        • ZCARD
        • ZRANGEBYSCORE
        • ZREM
        • ZREVRANGE
        • ZSCORE
        • PUBSUB
        • PUBLISH
        • SUBSCRIBE
        • UNSUBSCRIBE
        • PSUBSCRIBE
        • PUNSUBSCRIBE
    • Legal
      • Third party software
> Configure Yugabyte Platform >

Configure the on-premises cloud provider

Report a doc issue Suggest new content
  • Configure the on-premises provider
    • Complete the provider information
    • Configure hardware for YugabyteDB nodes
    • Define regions and zones
  • Add YugabyteDB nodes
    • Provision nodes manually
  • AWS
  • GCP
  • Azure
  • Kubernetes
  • VMware Tanzu
  • OpenShift
  • On-premises

You can configure the on-premises cloud provider for YugabyteDB using the Yugabyte Platform console. If no cloud providers are configured, the main Dashboard prompts you to configure at least one cloud provider, as per the following illustration:

Configure On-Premises Cloud Provider

Configure the on-premises provider

Configuring the on-premises provided consists of a number of steps.

Complete the provider information
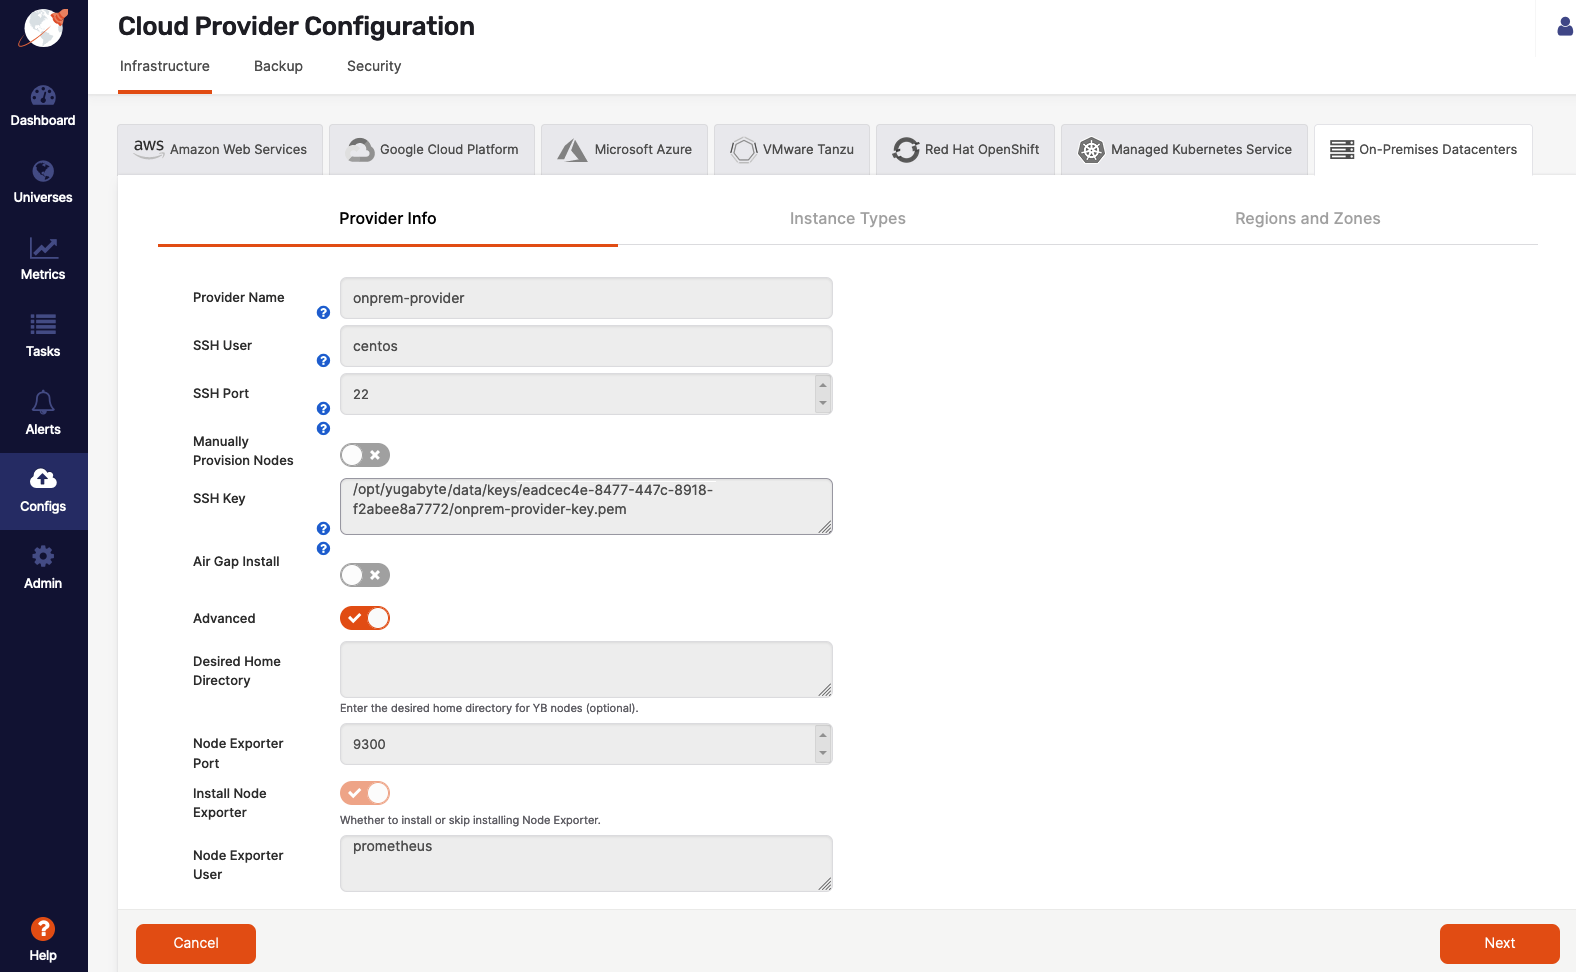
Configure On-Premises Cloud Provider

Provider Name

Supply the provider name, which is an internal tag that helps with organizing your providers, so you know where you want to deploy your YugabyteDB universes.

SSH User

To provision on-premises nodes with YugabyteDB, Yugabyte Platform requires SSH access to these nodes. Unless you plan to provision the database nodes manually, the user needs to have password-free sudo permissions to complete a few tasks.

If the SSH user requires a password for sudo access or the SSH user does not have sudo access, follow the steps described in Manually Provision Nodes.

SSH Port

Provide the port number of SSH client connections.

Manually Provision Nodes

Enable this option if you choose to manually set up your database nodes. Otherwise, Yugabyte Platform will use the sudo user to set up YugabyteDB nodes. For manual provisioning, you would be prompted to run a Python script at a later stage or to run a set of commands on the database nodes.

If any of the following statements are applicable to your use case, you need to provision the nodes manually:

  • Pre-provisioned yugabyte:yugabyte user and group.
  • Sudo user requires a password.
  • The SSH user is not a sudo user.

SSH Key

Ensure that the SSH key is pasted correctly (the supported format is RSA).

Air Gap Install

Enable this option if you want the installation to run in an air-gapped mode without expecting any internet access.

Desired Home Directory

Optionally, specify the home directory of the yugabyte user. The default value is /home/yugabyte.

Node Exporter Port

Specify the port number for the Node Exporter. The default value is 9300.

Install Node Exporter

Enable this option if you want the Node Exporter installed. You can skip this step if you have Node Exporter already installed on the nodes. Ensure you have provided the correct port number for skipping the installation.

Node Exporter User

Override the default Prometheus user. This is useful when the user is pre-provisioned on nodes (in case user creation is disabled). If overridden, the installer checks whether or not the user exists and creates the user if it does not exist.

Configure hardware for YugabyteDB nodes

Complete the Instance Types fields, as per the following illustration, to provide node hardware configuration (CPU, memory, and volume information):
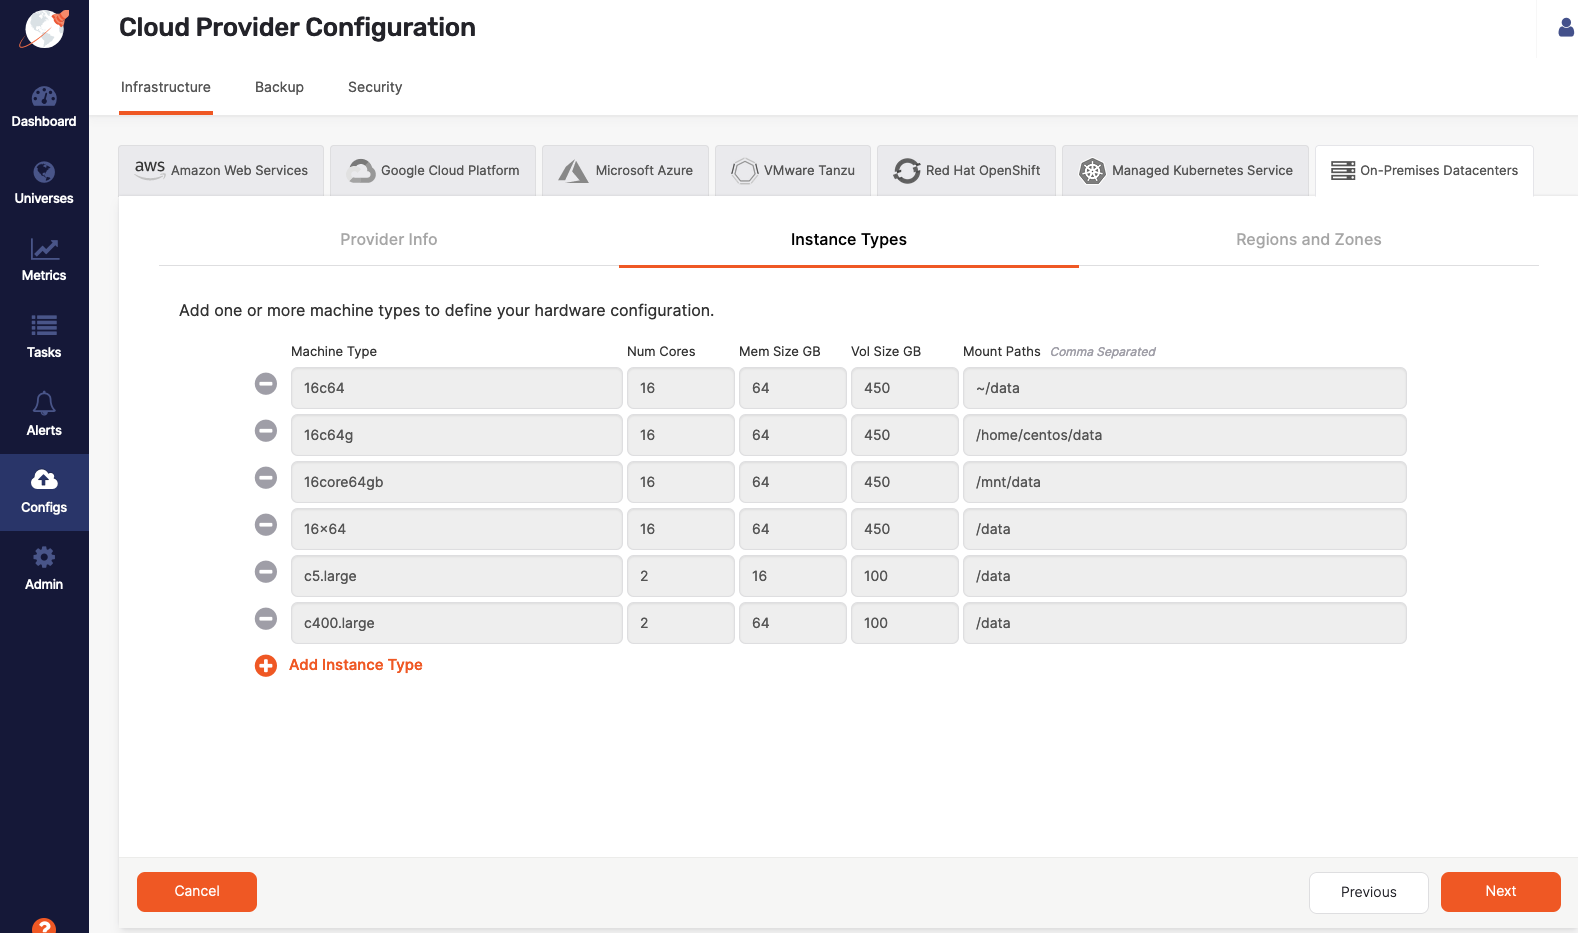
Configure On-Premises Cloud Provider

Machine Type

Define a value to be used internally as an identifier in the Instance Type universe field.

Num Cores

Define the number of cores to be assigned to a node.

Mem Size GB

Define the memory allocation of a node.

Vol size GB

Define the disk volume of a node.

Mount Paths

Define a mount point with enough space to contain your node density. Use /data. If you have multiple drives, add these as a comma-separated list, such as, for example, /mnt/d0,/mnt/d1.

Define regions and zones

Complete the Regions and Zones fields, as per in the following illustration, to provide the location of YugabyteDB nodes. Yugabyte Platform will use these values during the universe creation:
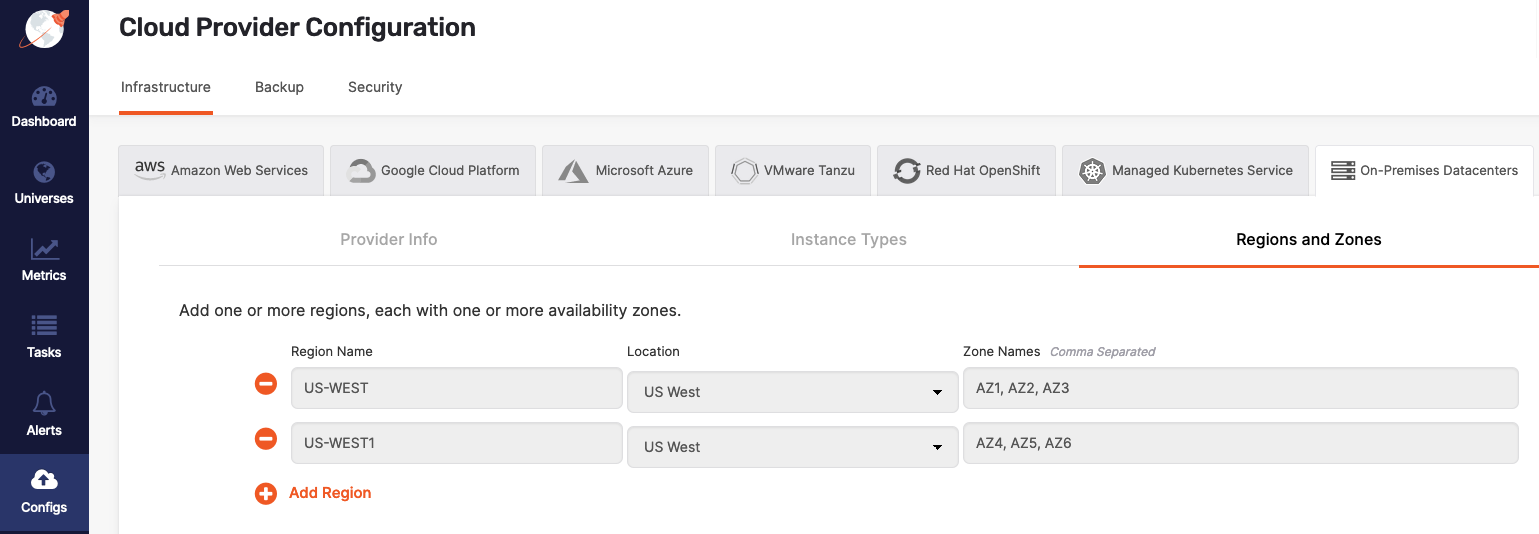
Configure On-Premises Cloud Provider

Add YugabyteDB nodes

After finishing the provider configuration, click Manage Instances to provision as many nodes as your application requires.
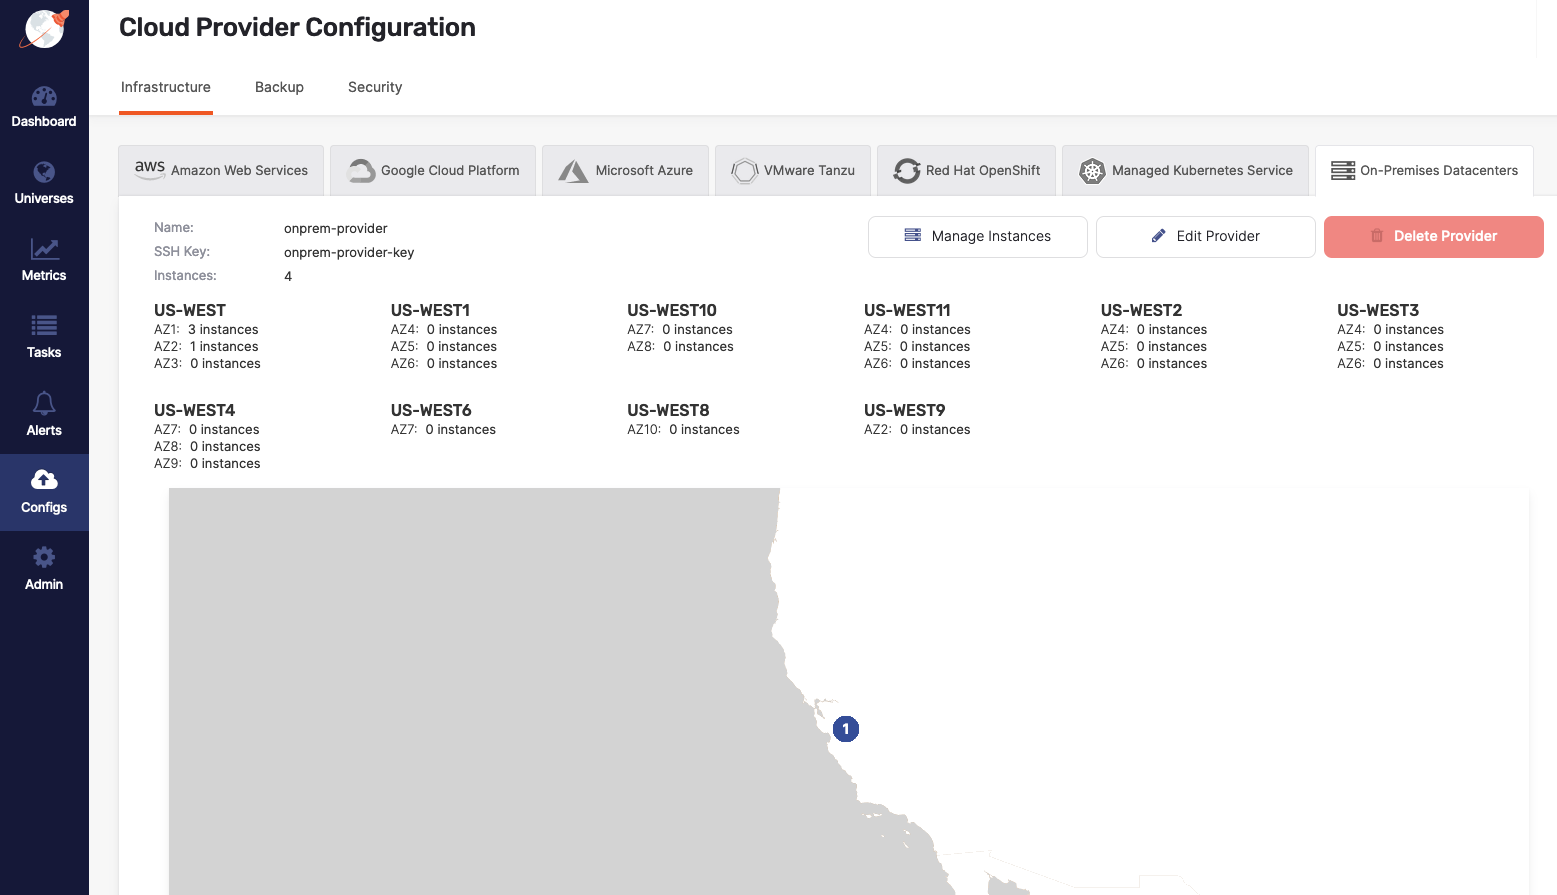
Configure On-Premises Cloud Provider

For each node you want to add, click Add Instances to add a YugabyteDB node. You can use DNS names or IP addresses when adding instances (instance ID is an optional user-defined identifier).
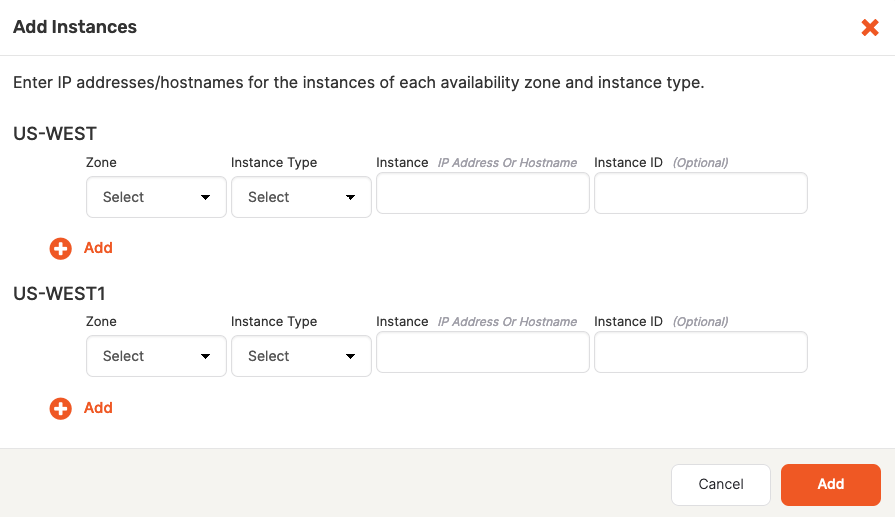
Configure On-Premises Cloud Provider

Provision nodes manually

To provision your nodes manually, you have the following two options:

  • If the SSH user you provided has sudo privileges but requires a password, you can run the pre-provisioning script.

  • If the SSH user does not have any sudo privileges, you need to set up the database nodes manually.

Running the pre-provisioning script

This step is only required if you set Manually Provision Nodes to true and the SSH user has sudo privileges which require a password; otherwise you skip this step.

You can manually provision each node using the pre-provisioning Python script, as follows:

  1. Login to Yugabyte Platform virtual machine via SSH.

  2. Access the docker yugaware container, as follows:

    sudo docker exec -it yugaware bash
    
  3. Copy and paste the Python script prompted via the UI and substitute for a node IP address and mount points. Optionally, use the --ask_password flag if the sudo user requires password authentication, as follows:

    bash-4.4# /opt/yugabyte/yugaware/data/provision/9cf26f3b-4c7c-451a-880d-593f2f76efce/provision_instance.py --ip 10.9.116.65 --mount_points /data --ask_password
    

    Expect the following output and prompt:

    Executing provision now for instance with IP 10.9.116.65...
    SUDO password:
    
  4. Wait for the script to finish successfully.

  5. Repeat step 3 for every node that will participate in the universe.

This completes the on-premises cloud provider configuration. You can proceed to Configure the backup target or Create deployments.

Setting up database nodes manually

This step is only required if you set Manually Provision Nodes to true and the SSH user does not have sudo privileges at all; otherwise you skip this step.

If the SSH user configured in the on-premises provider does not have sudo privileges, then you can set up each of the database nodes manually. Note that you need access to a user with sudo privileges in order to complete these steps.

For each node, perform the following:

  • Set up time synchronization
  • Open incoming TCP ports
  • Pre-provision the node
  • Install Prometheus node exporter
  • Install backup utilities
  • Set crontab permissions
Set up time synchronization

A local Network Time Protocol (NTP) server or equivalent must be available.

Ensure an NTP-compatible time service client is installed in the node OS (chrony is installed by default in the standard CentOS 7 instance used in this example). Then, configure the time service client to use the available time server. The procedure includes this step and assumes chrony is the installed client.

Open incoming TCP/IP ports

Database servers need incoming TCP/IP access enabled to the following ports, for communications between themselves and Yugabyte Platform:

Protocol Port Description
TCP 22 SSH (for automatic administration)
TCP 5433 YSQL client
TCP 6379 YEDIS client
TCP 7000 YB master webserver
TCP 7100 YB master RPC
TCP 9000 YB tablet server webserver
TCP 9042 YCQL client
TCP 9090 Prometheus server
TCP 9100 YB tablet server RPC
TCP 9300 Prometheus node exporter
TCP 12000 YCQL HTTP (for DB statistics gathering)
TCP 13000 YSQL HTTP (for DB statistics gathering)

The preceding table is based on the information on the default ports page.

Pre-provision nodes manually

This process carries out all provisioning tasks on the database nodes which require elevated privileges. Once the database nodes have been prepared in this way, the universe creation process from Yugabyte Platform will connect with the nodes only via the yugabyte user, and not require any elevation of privileges to deploy and operate the YugabyteDB universe.

Physical nodes (or cloud instances) are installed with a standard Centos 7 server image. The following steps are to be performed on each physical node, prior to universe creation:

  1. Login to each database node as a user with sudo enabled (the centos user in centos7 images).

  2. Add the following line to /etc/chrony.conf (sudo is required):

    server <your-time-server-IP-address> prefer iburst


    Then, run the following command:

    $ sudo chronyc makestep   # (force instant sync to NTP server)
    
  3. Add a new yugabyte:yugabyte user and group (sudo is required):

    $ sudo useradd yugabyte   # (add group yugabyte + create /home/yugabyte)
    $ sudo passwd yugabyte   # (add a password to the yugabyte user)
    $ sudo su - yugabyte   # (change to yugabyte user for convenient execution of next steps)


    Ensure that the yugabyte user has permissions to SSH into the YugabyteDB nodes (as defined in /etc/ssh/sshd_config).

  4. Copy the SSH public key to each DB node.


    This public key should correspond to the private key entered into the Yugabyte Platform provider.

  5. Run the following commands as the yugabyte user, after copying the SSH public key file to the user home directory:

    $ cd ~yugabyte
    $ mkdir .ssh
    $ chmod 700 .ssh
    $ cat <pubkey file> >> .ssh/authorized_keys
    $ chmod 400 .ssh/authorized_keys
    $ exit   # (exit from the yugabyte user back to previous user)
    
  6. Add the following lines to the /etc/security/limits.conf file (sudo is required):

    *                -       core            unlimited
    *                -       data            unlimited
    *                -       fsize           unlimited
    *                -       sigpending      119934
    *                -       memlock         64
    *                -       rss             unlimited
    *                -       nofile          1048576
    *                -       msgqueue        819200
    *                -       stack           8192
    *                -       cpu             unlimited
    *                -       nproc           12000
    *                -       locks           unlimited
    
  7. Modify the following line in the /etc/security/limits.d/20-nproc.conf file (sudo is required):

    *          soft    nproc     12000
    
  8. Install the rsync and OpenSSL packages (sudo is required).


    Note that most Linux distributions include rsync and openssl. If your distribution is missing these packages, install them using the following commands:

    $ sudo yum install openssl
    $ sudo yum install rsync


    For airgapped environments, make sure your yum repository mirror contains these packages.

  9. If running on a virtual machine, tune kernel settings (sudo is required):

    $ sudo bash -c 'sysctl vm.swappiness=0 >> /etc/sysctl.conf'
    $ sysctl kernel.core_pattern=/home/yugabyte/cores/core_%e.%p >> /etc/sysctl.conf
    
  10. Prepare and mount the data volume (separate partition for database data) (sudo is required):

    • List the available storage volumes:

      $ lsblk
      
    • Perform the following steps for each available volume (all listed volumes other than the root volume):

      $ sudo mkdir /data   # (or /data1, /data2 etc)
      $ sudo mkfs -t xfs /dev/nvme1n1   # (create xfs filesystem over entire volume)
      $ sudo vi /etc/fstab
      
    • Add the following line to /etc/fstab:

      /dev/nvme1n1   /data   xfs   noatime   0   0
      
    • Exit from vi, and continue:

      $ sudo mount -av (mounts the new volume using the fstab entry, to validate)
      $ sudo chown yugabyte:yugabyte /data
      $ sudo chmod 755 /data
      
Install Prometheus node exporter

For Yugabyte Platform versions 2.8 and later, download the 1.3.1 version of the Prometheus node exporter, as follows:

wget https://github.com/prometheus/node_exporter/releases/download/v1.3.1/node_exporter-1.3.1.linux-amd64.tar.gz

For Yugabyte Platform versions prior to 2.8, download the 0.13.0 version of the exporter, as follows:

$ wget https://github.com/prometheus/node_exporter/releases/download/v0.13.0/node_exporter-0.13.0.linux-amd64.tar.gz

If you are doing an airgapped installation, download the node exporter using a computer connected to the internet and copy it over to the database nodes.

Note that the instructions are for the 0.13.0 version. The same instructions are applicable to the 1.3.1 version, but you need to use the correct file name.

On each node, perform the following as a user with sudo access:

  1. Copy the node_exporter-....tar.gz package file that you downloaded into the /tmp directory on each of the YugabyteDB nodes. Ensure this file is readable by the centos user on each node (or another user with sudo privileges).

  2. Run the following commands (sudo required):

    $ sudo mkdir /opt/prometheus
    $ sudo mkdir /etc/prometheus
    $ sudo mkdir /var/log/prometheus
    $ sudo mkdir /var/run/prometheus
    $ sudo mv /tmp/node_exporter-0.13.0.linux-amd64.tar  /opt/prometheus
    $ sudo adduser prometheus (also adds group “prometheus”)
    $ sudo chown -R prometheus:prometheus /opt/prometheus
    $ sudo chown -R prometheus:prometheus /etc/prometheus
    $ sudo chown -R prometheus:prometheus /var/log/prometheus
    $ sudo chown -R prometheus:prometheus /var/run/prometheus
    $ sudo chmod +r /opt/prometheus/node_exporter-0.13.0.linux-amd64.tar
    $ sudo su - prometheus (user session is now as user “prometheus”)
    
  3. Run the following commands as user prometheus:

    $ cd /opt/prometheus
    $ tar zxf node_exporter-0.13.0.linux-amd64.tar.gz
    $ exit   # (exit from prometheus user back to previous user)
    
  4. Edit the following file (sudo required):

    $ sudo vi /etc/systemd/system/node_exporter.service


    Add the following to /etc/systemd/system/node_exporter.service:

    [Unit]
    Description=node_exporter - Exporter for machine metrics.
    Documentation=https://github.com/William-Yeh/ansible-prometheus
    After=network.target
    
    [Install]
    WantedBy=multi-user.target
    
    [Service]
    Type=simple
    
    #ExecStartPre=/bin/sh -c  " mkdir -p '/var/run/prometheus' '/var/log/prometheus' "
    #ExecStartPre=/bin/sh -c  " chown -R prometheus '/var/run/prometheus' '/var/log/prometheus' "
    #PIDFile=/var/run/prometheus/node_exporter.pid
    
    User=prometheus
    Group=prometheus
    
    ExecStart=/opt/prometheus/node_exporter-0.13.0.linux-amd64/node_exporter  --web.listen-address=:9300 --collector.textfile.directory=/tmp/yugabyte/metrics
    
  5. Exit from vi, and continue (sudo required):

    $ sudo systemctl daemon-reload
    $ sudo systemctl enable node_exporter
    $ sudo systemctl start node_exporter
    
  6. Check the status of the node_exporter service with the following command:

    $ sudo systemctl status node_exporter
    
Install backup utilities

Yugabyte Platform supports backing up YugabyteDB to AWS S3, Azure Storage, Google Cloud Storage, and NFS. Install the backup utility for the backup storage you plan to use:

NFS - Install rsync. Yugabyte Platform uses rsync to do NFS backups which you installed in an earlier step.

AWS S3 - Install s3cmd. Yugabyte Platform relies on s3cmd to support copying backups to AWS S3. You have the following installation options:

  • For a regular installation, execute the following:

    $ sudo yum install s3cmd
    
  • For an airgapped installation, copy /opt/third-party/s3cmd-2.0.1.tar.gz from the Yugabyte Platform node to the database node, and then extract it into the /usr/local directory on the database node, as follows:

    $ cd /usr/local
    $ sudo tar xvfz path-to-s3cmd-2.0.1.tar.gz
    $ sudo ln -s /usr/local/s3cmd-2.0.1/s3cmd /usr/local/bin/s3cmd
    

Azure Storage - Install azcopy using one of the following options:

  • Download azcopy_linux_amd64_10.13.0.tar.gz using the following command:

    $ wget https://azcopyvnext.azureedge.net/release20200410/azcopy_linux_amd64_10.13.0.tar.gz
    
  • For airgapped installations, copy /opt/third-party/azcopy_linux_amd64_10.13.0.tar.gz from the Yugabyte Platform node, as follows:

    $ cd /usr/local
    $ sudo tar xfz path-to-azcopy_linux_amd64_10.13.0.tar.gz -C /usr/local/bin azcopy_linux_amd64_10.13.0/azcopy --strip-components 1
    

Google Cloud Storage - Install gsutil using one of the following options:

  • Download gsutil_4.60.tar.gz using the following command:

    $ wget https://storage.googleapis.com/pub/gsutil_4.60.tar.gz
    
  • For airgapped installs, copy /opt/third-party/gsutil_4.60.tar.gz from the Yugabyte Platform node, as follows:

    $ cd /usr/local
    $ sudo tar xvfz gsutil_4.60.tar.gz
    $ sudo ln -s /usr/local/gsutil/gsutil /usr/local/bin/gsutil
    
Set crontab permissions

Yugabyte Platform supports performing YugabyteDB liveness checks, log file management, and core file management using cron jobs.

Note that sudo is required to set up this service.

If Yugabyte Platform will be using cron jobs, make sure that the yugabyte user is allowed to run crontab:

  • If you are using the cron.allow file to manage crontab access, add the yugabyte user to this file.
  • If you are using the cron.deny file, remove the yugabyte user from this file.

If you are not using either file, no changes are required.

You have finished configuring your on-premises cloud provider. Proceed to Configure the backup target, or Create deployments.

  • Configure the on-premises provider
    • Complete the provider information
    • Configure hardware for YugabyteDB nodes
    • Define regions and zones
  • Add YugabyteDB nodes
    • Provision nodes manually
Ask our community
  • Slack
  • Github
  • Forum
  • StackOverflow
Yugabyte
Contact Us
Copyright © 2017-2022 Yugabyte, Inc. All rights reserved.