Manage peering connections
A peering connection connects a Yugabyte Cloud VPC with a VPC on the corresponding cloud provider - typically one that hosts an application that you want to have access to your cluster.
Configuring a peering connection is done in two stages:
- Create the peering connection in Yugabyte Cloud.
- Configure the peering in your cloud provider.
- In AWS, this requires accepting the peering request.
- In GCP, this requires creating a peering connection.
Peering Connections on the VPC Network tab displays a list of peering connections configured for your cloud that includes the peering connection name, cloud provider, the network name (GCP) or VPC ID (AWS) of the peered VPC, the name of the Yugabyte VPC, and status of the connection (Pending or Active).

To view the peering connection details, select a peering connection in the list to display the Peering Details sheet.
To terminate a peering connection, click the Delete icon for the peering connection in the list you want to terminate, then click Terminate. You can also terminate a peering connection by clicking Terminate Peering in the Peering Details sheet.
Note
If you have an Active peering connection but are unable to connect to a cluster in the VPC, ensure that you have added the CIDR block of the peered application VPC to your cluster's IP allow list. For information on adding IP allow lists, refer to Assign IP allow lists.Create a peering connection
Before you can peer with an AWS application VPC, you must have created at least one VPC in Yugabyte Cloud that uses AWS.
You need the following details for the AWS application VPC you are peering with:
- Account ID
- VPC ID
- VPC region
- VPC CIDR address
To obtain these details, navigate to your AWS Your VPCs page for the region hosting the VPC you want to peer.
To create a peering connection, in Yugabyte Cloud do the following:
- On the Network Access page, select VPC Network, then Peering Connections.
- Click Add Peering Connection to display the Create Peering sheet.
- Enter a name for the peering connection.
- Choose AWS.
- Choose the Yugabyte Cloud VPC you are peering. Only VPCs that use AWS are listed.
- Enter the AWS account ID, and the application VPC ID, region, and CIDR address.
- Click Initiate Peering.
The peering connection is created with a status of Pending. To complete the peering, you must accept the peering request in your AWS account.
Accept the peering request in AWS
To complete a Pending peering connection, you need to sign in to AWS, accept the peering request, and add a routing table entry.
You'll need the CIDR address of the Yugabyte Cloud VPC you are peering with. You can view and copy this in the VPC Details sheet on the VPCs page or the Peering Details sheet on the Peering Connections page.
After you sign in to your AWS account, navigate to the region hosting the VPC you want to peer.
DNS settings
Before accepting the request, ensure that the DNS hostnames and DNS resolution options are enabled for the VPC. This ensures that the cluster's hostnames in standard connection strings automatically resolve to private instead of public IP addresses when the Yugabyte Cloud cluster is accessed from the application VPC. To set DNS settings:
- On the AWS Your VPCs page, select the VPC in the list.
- Click Actions and choose Edit DNS hostnames or Edit DNS resolution.
- Enable the DNS hostnames or DNS resolution option and click Save changes.
Accept the peering request
To accept the peering request, do the following:
- On the AWS Peering Connections page, select the VPC in the list; its status is Pending request.
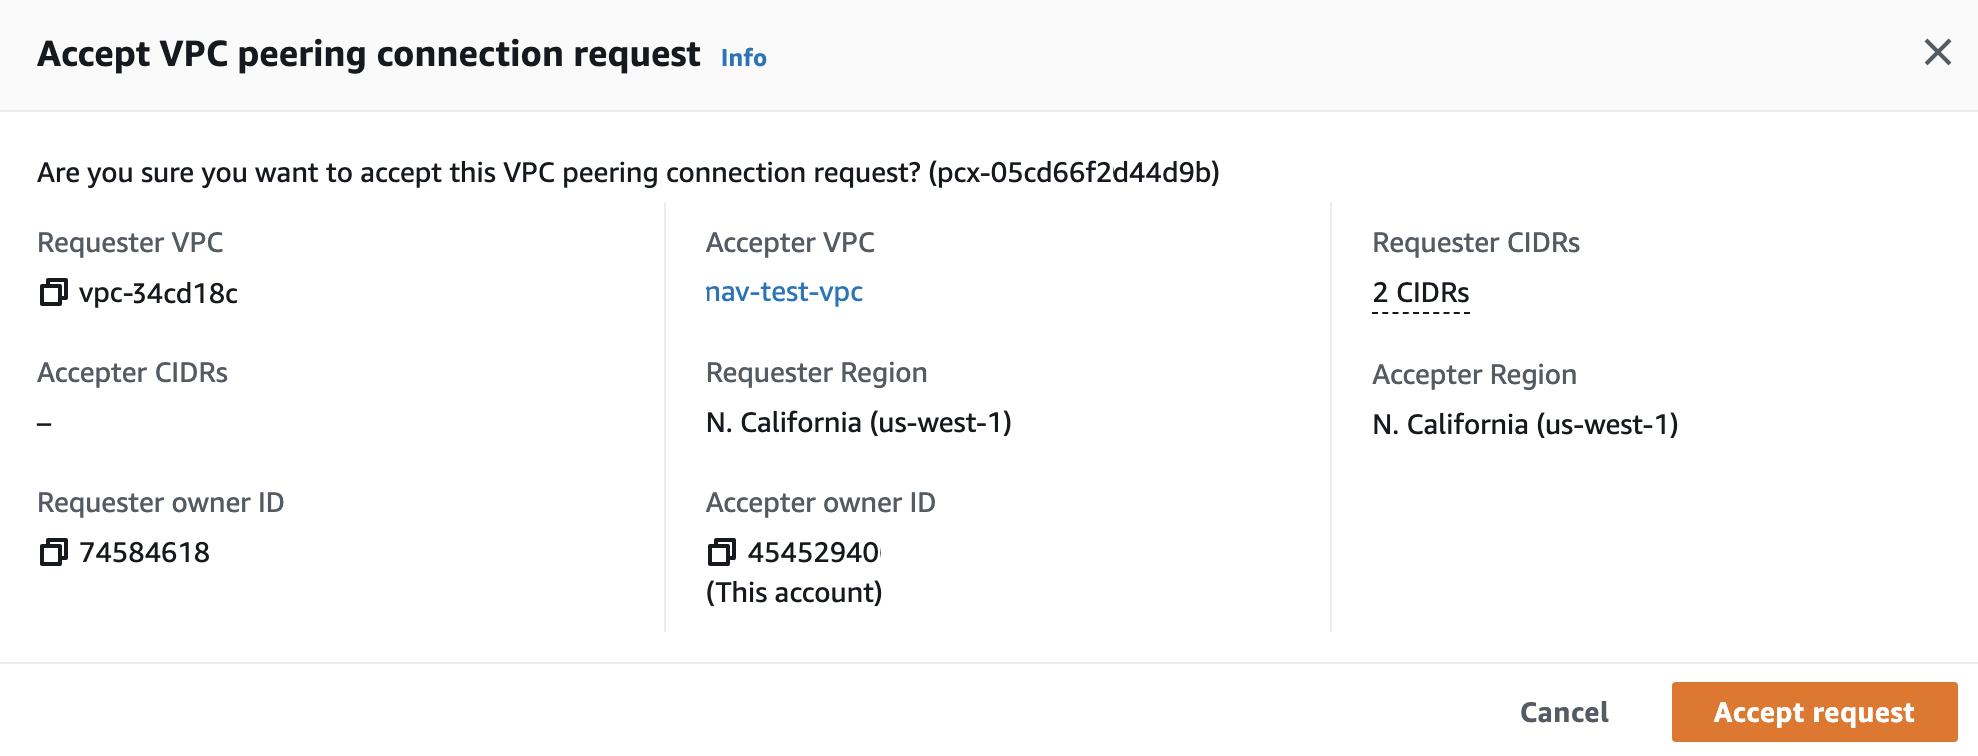
- Click Actions and choose Accept request to display the Accept VPC peering connection request window.

- Click Accept request.
Note the Peering connection ID; you will use it when adding the routing table entry.
Add the routing table entry
To add a routing table entry:
- On the AWS Route Tables page, select the route table associated with the VPC peer.
- Click Actions and choose Edit routes to display the Edit routes window.

- Click Add route.
- Add the Yugabyte Cloud cluster CIDR address to the Destination column, and the Peering connection ID to the Target column.
- Click Save changes.
When finished, the status of the peering connection in Yugabyte Cloud changes to Active if the connection is successful.
For information on VPC network peering in AWS, refer to VPC Peering in the AWS documentation.
Before you can peer with a GCP application VPC, you must have created at least one VPC in Yugabyte Cloud that uses GCP.
You need the following details for the GCP application VPC you are peering with:
- GCP project ID
- VPC name
- VPC CIDR address
To obtain these details, navigate to your GCP VPC networks page.
To create a peering connection, do the following:
- On the Network Access page, select VPC Network, then Peering Connections.
- Click Add Peering Connection to display the Create Peering sheet.
- Enter a name for the peering connection.
- Choose GCP.
- Choose the Yugabyte Cloud VPC. Only VPCs that use GCP are listed.
- Enter the GCP Project ID, application VPC network name, and, optionally, VPC CIDR address.
- Click Initiate Peering.
The peering connection is created with a status of Pending. To complete the peering, you must create a peering connection in GCP.
Create a peering connection in GCP
To complete a Pending peering connection, you need to sign in to GCP and create a peering connection.
You'll need the Project ID and VPC network name of the Yugabyte Cloud VPC you are peering with. You can view and copy these details in the VPC Details sheet on the VPCs page or the Peering Details sheet on the Peering Connections page.
In the Google Cloud Console, do the following:
-
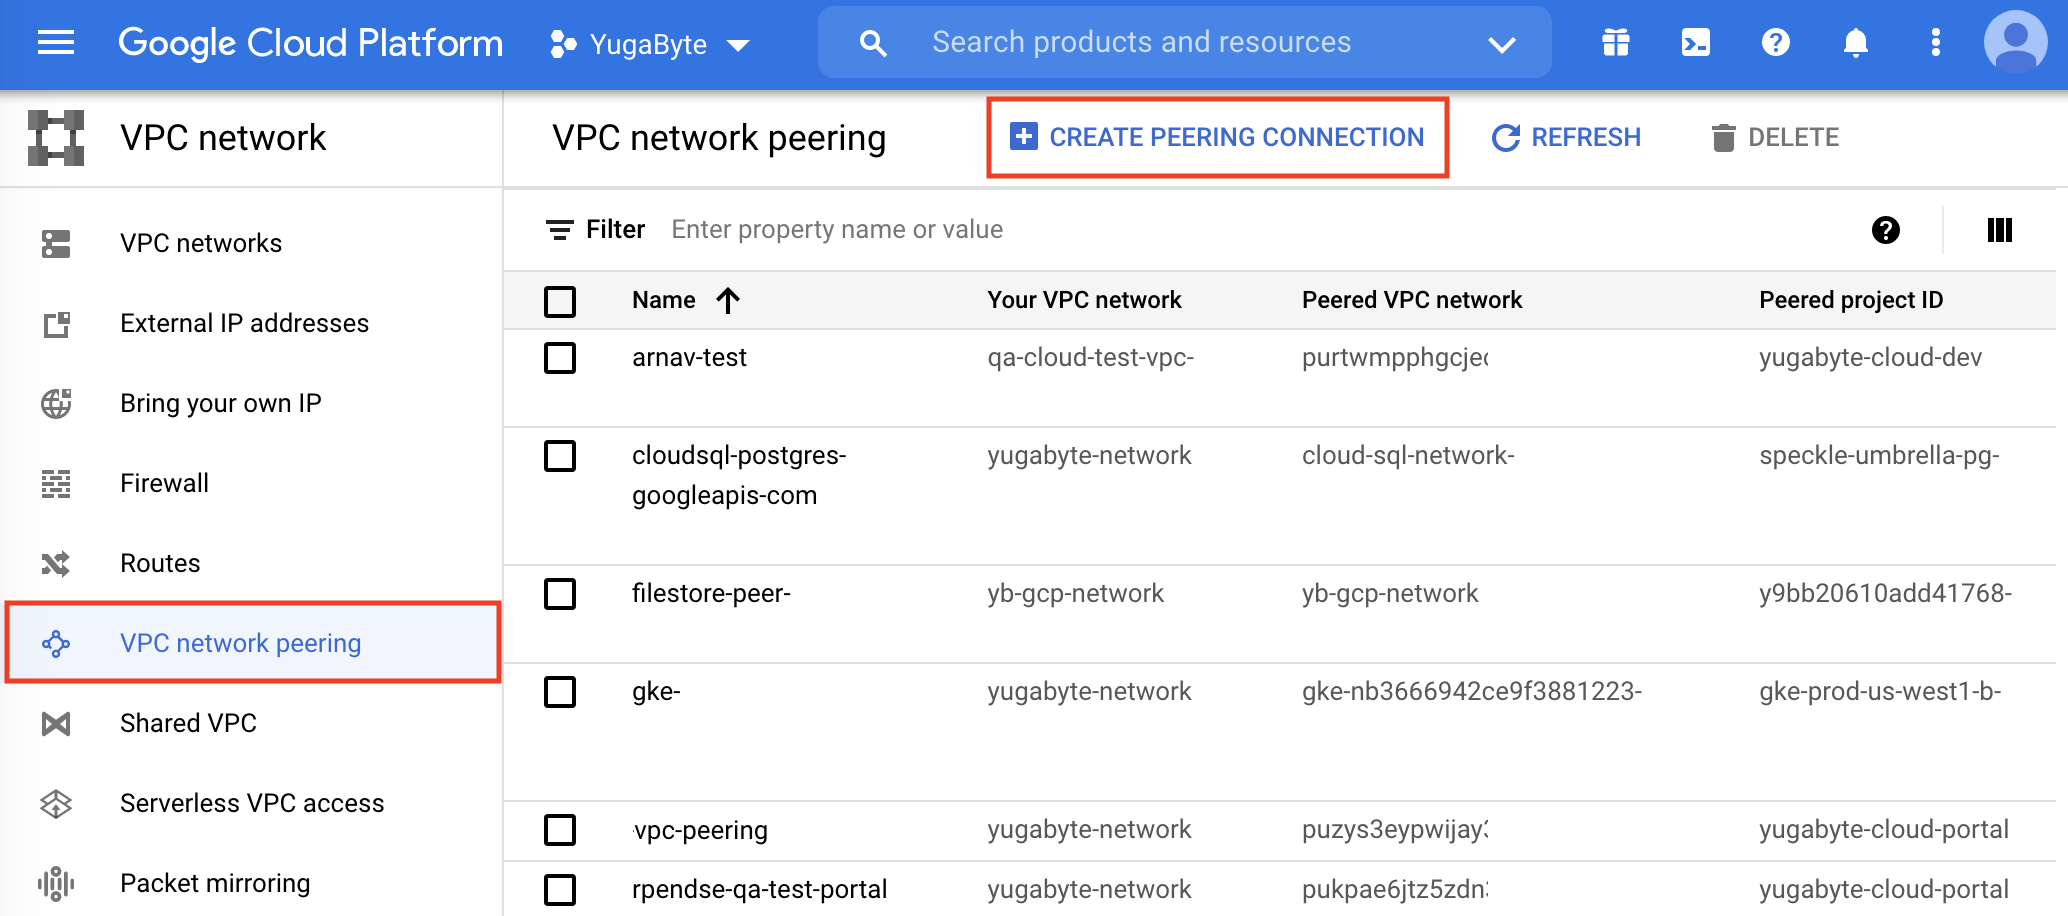
Under VPC network, select VPC network peering and click Create Peering Connection.

-
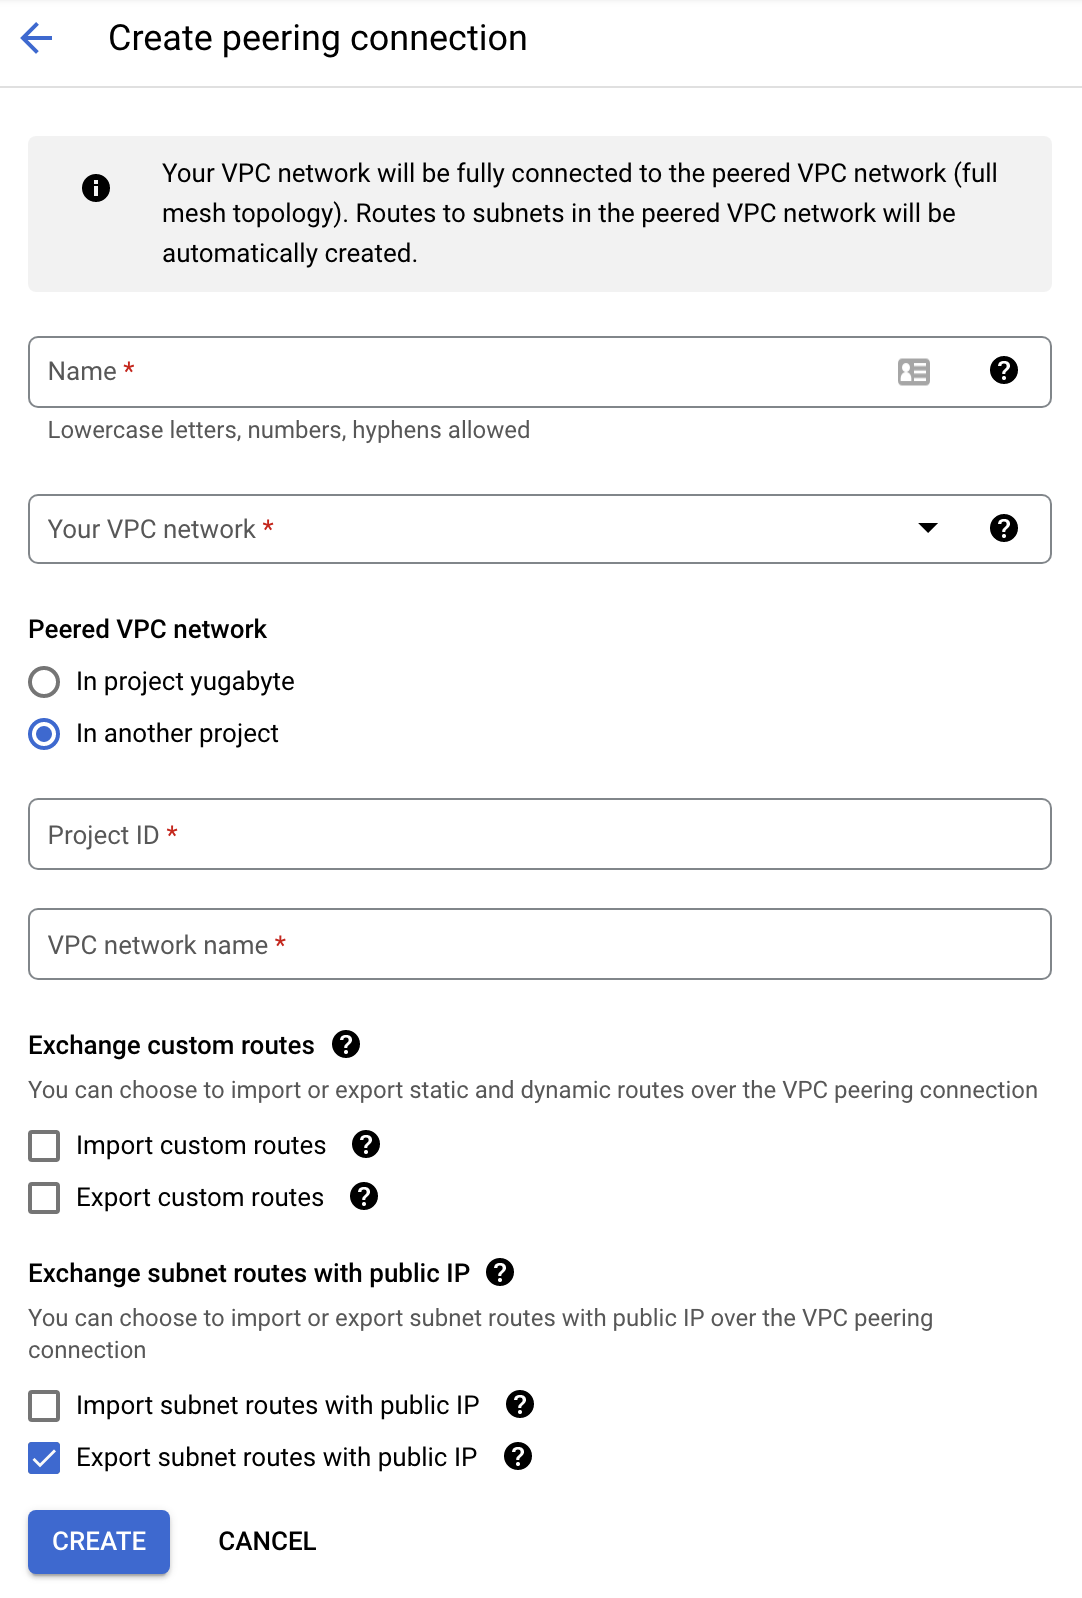
Click Continue to display the Create peering connection details.

-
Enter a name for the GCP peering connection.
-
Select your VPC network name.
-
Select In another project and enter the Project ID and VPC network name of the Yugabyte Cloud VPC you are peering with.
-
Click Create.
When finished, the status of the peering connection in Yugabyte Cloud changes to Active if the connection is successful.
For information on VPC network peering in GCP, refer to VPC Network Peering overview in the Google VPC documentation.
Add the peered application VPC to your cluster IP allow list
Once the VPC and the peering connection are active, you need to add at least one of the CIDR blocks associated with the peered application VPC to the IP allow list for your cluster.
- On the Clusters page, select your cluster.
- Click Quick Links and Edit IP Allow List.
- Click Create New List and Add to Cluster.
- Enter a name for the allow list.
- Enter the IP addresses or CIDR.
- Click Save.