2. Create a local cluster
1. Create a local cluster
Create a YugabyteDB cluster in Minikube using the commands below. Note that for Helm, you have to first create a namespace.
$ kubectl create namespace yb-demo
$ helm install yb-demo yugabytedb/yugabyte \
--set resource.master.requests.cpu=0.5,resource.master.requests.memory=0.5Gi,\
resource.tserver.requests.cpu=0.5,resource.tserver.requests.memory=0.5Gi,\
replicas.master=1,replicas.tserver=1 --namespace yb-demo
Note that in Minikube, the LoadBalancers for yb-master-ui and yb-tserver-service will remain in pending state since load balancers are not available in a Minikube environment. If you would like to turn off these services then pass the enableLoadBalancer=False flag as shown below.
$ helm install yb-demo yugabytedb/yugabyte \
--set resource.master.requests.cpu=0.5,resource.master.requests.memory=0.5Gi,\
resource.tserver.requests.cpu=0.5,resource.tserver.requests.memory=0.5Gi,\
replicas.master=1,replicas.tserver=1,enableLoadBalancer=False --namespace yb-demo
2. Check cluster status with kubectl
Run the following command to see that you now have two services with one pod each — 1 yb-master pod (yb-master-0) and 1 yb-tserver pod (yb-tserver-0) running. For details on the roles of these pods in a YugabyteDB cluster (aka Universe), see Universe in the Concepts section.
$ kubectl --namespace yb-demo get pods
NAME           READY     STATUS              RESTARTS   AGE
yb-master-0    0/2       ContainerCreating   0          5s
yb-tserver-0   0/2       ContainerCreating   0          4s
Eventually, all the pods will have the Running state.
NAME           READY     STATUS    RESTARTS   AGE
yb-master-0    2/2       Running   0          13s
yb-tserver-0   2/2       Running   0          12s
To see the status of the three services, run the following command.
$ kubectl --namespace yb-demo get services
NAME                 TYPE           CLUSTER-IP     EXTERNAL-IP   PORT(S)                                        AGE
yb-master-ui         LoadBalancer   10.98.66.255   <pending>     7000:31825/TCP                                 119s
yb-masters           ClusterIP      None           <none>        7100/TCP,7000/TCP                              119s
yb-tserver-service   LoadBalancer   10.106.5.69    <pending>     6379:31320/TCP,9042:30391/TCP,5433:30537/TCP   119s
yb-tservers          ClusterIP      None           <none>        7100/TCP,9000/TCP,6379/TCP,9042/TCP,5433/TCP   119s
3. Check cluster status with Admin UI
To check the cluster status, you need to access the Admin UI on port 7000 exposed by the yb-master-ui service. In order to do so, you need to find the port forward the port.
$ kubectl --namespace yb-demo port-forward svc/yb-master-ui 7000:7000
Now, you can view the yb-master-0 Admin UI at http://localhost:7000.
Overview and YB-Master status
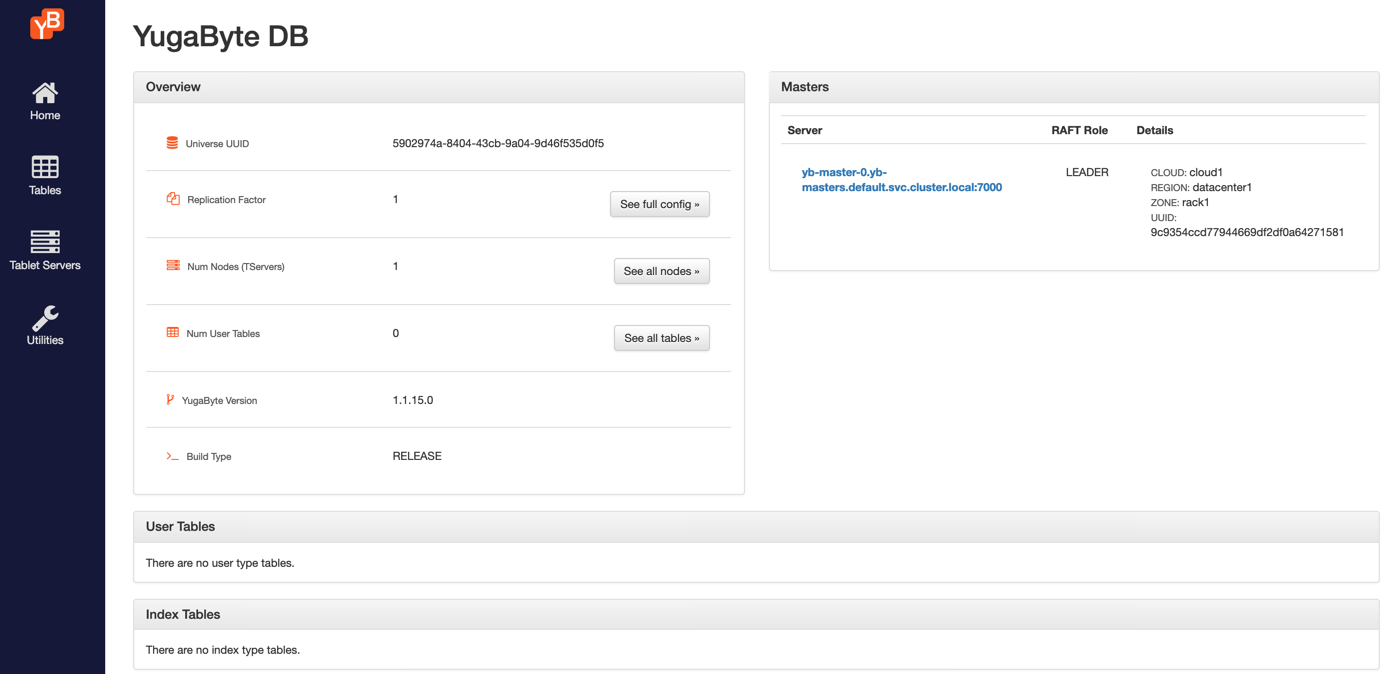
The yb-master-0 home page shows that you have a cluster with Replication Factor of 1 and Num Nodes (TServers) as 1. The Num User Tables is 0 because there are no user tables created yet. The YugabyteDB version is also displayed for your reference.

The Masters section highlights the YB-Master service along its corresponding cloud, region and zone placement information.
YB-TServer status
Click See all nodes to go to the Tablet Servers page where you can observe the one YB-TServer along with the time since it last connected to the YB-Master using regular heartbeats. As new tables get added, new tablets will get automatically created and distributed evenly across all the available YB-TServers.

Next step
Explore YSQL